
American Twist
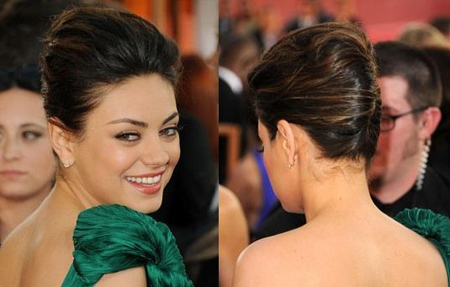
This look is fantastic and easy on hair with some natural "wiggle!" Texture lends itself so easily to this style and makes the look elegant but effortless. I call it an "American Twist" rather than "French" because it is purposely less structured and easier to create. A classic French Twist usually starts with one side of the back and nape swept over to the opposite side very fitted to the head and pinned up the center. Then the entire bulk of the hair gets twisted or rolled in and up. Not to be judgmental, but most versions I see look great on one side and then unfortunately "tumor-esque" and voluminous in the wrong way on the other side! Learning to finesse the twist in a single section evens out the bulk, keeps the look less fixed and old-fashioned, and is ultimately much easier to pin and anchor into place.
Here's what you'll need:
- Bobby pins, roller pins (long bobbies) and hair pins (suited to haircolor)
- Wide-toothed comb and a natural bristle brush
- Rat-tail comb or styling pick-comb
- Goldwell StyleSign products- ideally Jelly Boost, Double Boost or Hot Form, Magic Finish and Diamond Gloss.
Step-By-Step
Step 1 - Dress the hair: Hair with a day or two of "wear" usually performs better than freshly shampooed hair, but if you are starting from scratch encourage the natural undulation in the hair. Try StyleSign Jelly Boost for scrunching in "wiggle", Double Boost at the root if the hair needs amplification and volume, or Hot Form if it needs soothing and frizz-reduction. Work to keep the hair soft and easy to finger or comb through. If the hair is too slippery and needs some tactility have her lean forward and spray the hair with Magic Finish to give it some grip.
Step 2 - Direct and Section: Start by raking through the hair with only your fingers and work the hair to the back as if you were making a ponytail. Once the hair is headed in the right direction, stop for a minute and section out the hair on top. I usually go for a big "pie-shaped" section with the "crust" edge being the widest part at the front from recession-to-recession and the narrow point extending back at least as far as the "whirl" growth pattern in the crown. Backcomb with the wide-toothed comb or your fingers if you are working to keep the natural texture or use a brush for smoother hair types to create a nice, voluminous base.
Step 3 - Build the Twist: Resume with the finger-raking technique and make sure you love what the top and sides are doing as you pull the hair back. Mist with Magic Finish if it helps. Converge all the hair straight off the back of the head. Gather the ends and ball them up to create a makeshift "roller" and wind the hair to the head to create the twist. Experiment a few times to determine which angle works best to have the twist sitting ON BASE on center of the back of the head and not to one side. While rolling toward the head try turning both edges (nape end and top end) inward almost like a crescent roll or a burrito so you don't just end up with a "tube!"
Step 4 - Anchor the Twist: Use one or two roller pins INSIDE the roll snugly right against the head vertically. Use one or two regular bobby pins to drag the nape hair more neatly into the bottom of the twist.
Step 5 - Adjust the Silhouette: Use the tail comb or pick to pull out anywhere that needs it. Open up the twist to keep it from looking too exact. The backcombing in the crown should lend itself to adjusting the hair by either tucking in or pulling out available tether in the packing.
Step 6 - Pin the Twist Seam: Use the hairpins just like staples starting from the nape and working up. Proper tension, even spacing, and a gentle touch should keep the pins practically invisible.
Step 7 - Check for Comfort: I always have my client shake their head a little or let me know if anything hurts! Teach your lady how to reach back and nonchalantly tap her seam occasionally to keep the pins tidy!
Step 8 - Polish and Tidy: Use a bit more spray if needed to seal the deal. Create more raked ridges if that looks interesting with your fingers and spray. Mist with Diamond Gloss for some Holiday sparkle.
Style Note: A beautiful comb, flower, or piece of jewelry can look stunning right in the seam up the back. Understated is best but a little surprise back there can be so sexy!
Easy, but elegant hairstyles like this are fun and simple to create and can really set you apart from other stylists in your market.