
Sleek Sexy Up-Do
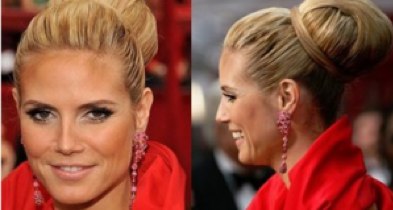
The drama of this look comes from the large scale of the bun itself. Too small of a bun can look slightly anemic and schoolmarm-ish. Get this one big and beautiful and create an amazing silhouette!
Here's what you'll need:
- Elastics
- Bobby pins and hair pins (suited to haircolor)
- Some type of form- foam donuts are the easiest and even drugstores carry them. Small styrofoam ones can work from the craft store or you can even use "rats" of teased, balled up hair (hopefully extension hair!) to create the volume like they did in the old days.
- Goldwell StyleSign products- ideally Flat Marvel, Diamond Gloss, Mello Goo or Unlimitor, and Sprayer
For hair lacking enough length or substance to work with use human-hair extensions in a corresponding color that works with the existing canvas. They are readily available at most beauty supplies and come in many shade variations. Some suppliers have ready-made buns that clip on quite easily. Otherwise you can save time and anguish by pre-wrapping the form you choose with wefts of the extension hair. Work it around and pin but pay attention to your tension and ensure full coverage. Having all this done in advance saves major time prior to actual installation.
Quick Tip: Remember that it looks far more natural for the extension hair to be slightly lighter and cooler in shade than the client's actual haircolor. Think of how the hair would look if it were really quite long. Mix strands of extensions together to customize the look of the wefts.
Step-By-Step With Extension Hair
Step 1 - Decide how "dressed" you would like to see the overall canvas and dress the hair accordingly. If starting from the blow-dry I recommend Flat Marvel for soothing and smoothing the perimeter hair that will be seen and showcased. If you are working with "dirty" hair give it a thorough brushing with a high-quality bristle brush. Mist with Diamond Gloss if the hair appears dull or has fly-aways.
Step 2 - Take a circular section (5"-6") and use an elastic to create a ponytail where the bun will anchor. Pull the ponytail through the center of your pre-wrapped bun form and secure with bobby pins underneath. Make sure it is stable and centered. Fan out the ponytail and wrap it from the center out around the circumference of the bun. Use a tail comb to drag and tuck the ends neatly around the bun and use hair pins minimally to secure.
Step 3 - Section the remaining hair into 4 distinct sections; all of the hair below the bun and behind the ears, the top from recession to recession back to the bun, and the two sides leftover.
Step 4 - Starting with the nape- brush the hair up toward the bun. Smooth it over the "hump" and tuck all the available length INTO the center of the bun but not too tightly. Try a half twist at the nape instead of straight up if it makes the silhouette cleaner. Keep the hair tucked loosely in the hole but do not anchor yet.
Step 5 - Add the sides into the bun in this same manner. Spray and comb for smoothness but do not pin just yet.
Step 6 - Use a small amount of extension hair to gently wrap around the bun where it meets the head to begin the indentation around the circle and pin. As the wrap-around hair tightens into the crevice, the slack of the unpinned hair in the hole will come out slightly. Neaten and re-tuck if needed.
Step 7 - For the top- a bit of back-brushing to create volume looks best. Use the brush to comb the surface hair until smooth but not enough to remove your packing. Add this section straight back to the indentation and carefully pin at the wrap-around hair from before. Smooth the rest up and over the bun covering the hole and distribute any remaining length around the circle if it is long enough to reach the back of the bun. If it's too short go for the hole!
Style Note: A side bang or heavy fringe looks equally amazing with this style!
Step 8 - Smooth and finalize any additional pinning if necessary. Remove some pins if too many are obvious and not needed. Use one last piece of extension hair to wind around the bun again- this time disguising the front section's indentation pins and adding interest.
Style Note: A beautiful braided piece wound around instead of a smooth piece can look spectacular! Or small flowers, beads, ribbon, etc. Less is usually more but try something appropriate for the occasion. This kind of signature styling is a real business builder!
Step 9 - Give the style one last polish with an additional mist of Sprayer finishing spray. If hold is not an issue but the surface is rough try some Unlimitor or Mello Goo on your hands and dress the fly-aways carefully.
The right up-style on the right girl in the right dress is always stunning. What could be more rewarding than helping someone look so beautiful? Happy Styling, love Robert.