
Drew Barrymore's Ombre Conversion To Red
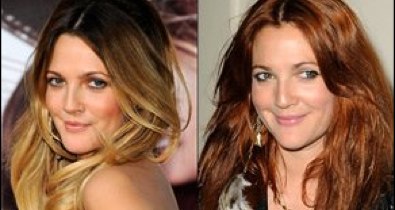
The buzz is all about Drew Barrymore's newest role as a Cinnamon Siren. No wonder with all of the bad copycat versions of her signature dark-into-light color for several seasons so going red makes for an exciting change. If you have some "ombres" of your own ready for a little reinvention then hopefully you'll enjoy my approach on implementing the conversion. Patience and a few extra steps will ensure a more even and durable color result. The retouches are super easy once the target shade has been established but keeping mids and ends balanced may be more challenging depending on the integrity level of the lightest pieces. Before I share some ideas on formulating this roll-over technique I thought I would start with what I consider to be an educated, "need-to-know" list of things to look for and consider during the consolation.
Need To Know
Step 1 - Look through all of the hair and determine exactly how much of the hair is actually
color diffused. Judge how gracefully placed you think the color transitions are. Strong bands of horizontal color are a definite warning flag. These zones will require the most finesse. The more seamless the dark moves into the light the less labor-intensive the technique will be.
Step 2 - Establish whether or not the dark shade is natural or color-treated. This zone will ultimately dictate the realm of possibility where the products and shade choices are concerned. All natural should be easiest of course. Color-treated hair not so much. And a client with several inches of natural re-growth moving into dark levels of color-treated hair obviously have yet another zone to contend with while addressing the entire canvas.
Step 3 - Test the integrity of the blondest parts separately. Feel for excessive porosity issues. Whenever possible, shears are one of the best tools in pre-color preparation! Otherwise be ready to use additional products to promote even color uptake without the ends grabbing the shade in an off-tone.
Step 4 - Assess each of the zones separately. Use pen and paper unless you have photographic memory. 10 more minutes spent on the consult and formulation time will translate into time saved at the other end of the process. The goal is obviously to achieve a believable, gorgeous result. But part of that goal should include the most impactful color choices in the fewest number of steps-all with total regard to the hair's overall integrity.
Communicating color is one of the most subjective topics on the planet. I try to always take into consideration how differently shades read in photographs with the addition of flash. One idea I like to share when formulating from a photograph is to pull the swatches you are considering and place them together where you can take a quick snapshot of them with your phone. Most new smart phones feature built-in flash and you'll see immediately if your selections translate as they do in the photos. You'll soon realize that most of your shade choices will need to be a little darker and richer than you have anticipated. That being said, I envision Drew's new color to be a marriage between 6KG and 6KR. In addition to my blueprints for formulation I will ned to ready my workspace and product choices for each of the various zones. I have formulated for only three larger zones but if you encounter the entire array, be prepared and just break it down. Try to find the common denominator that you can either shift or deposit into to even them up. It's challenging but VERY rewarding when you succeed!
Regrowth>Dark Minds>Transitional Areas>Light Minds>Overly-lightened Ends
Here's the thing about this transformation. It seems that this should all be as easy as filling and tinting-back the light parts while transforming the dark hair to the desired target shade. The reality is this-even if we are able to nail the target shade throughout the hair thinking that the finish of the light and dark areas will match perfectly is naive. Project ahead and try to imagine the full cavas after a few weeks of daily wear and tear or some time in the sun. It is the transitional zone that concerns me the most. The best way to assure a positive result involves introducing some light pieces up into the dark hair. Vertical color placement is the best way to blend through a horizontal band and will help create some similar porosity. This could certainly be done afterwards but Drew's look is not red with highlights-it is a chestnut red that is rich and luxurious throughout. Therefore, I would use Goldwell's Silklift Strong with 20 volume and a Silklift Serum added in for additional protection utilizing a standard patterned highlighting technique. Heavily woven or moderately sliced to basically "connect the dots" with the previous lightened areas. It needn't be as heavy or as light as the hair you're blending into- just anything to trick the eye and blend up higher on the head. Apply the lightener away from the scalp as if it had already grown out quite a bit onto each foil. Creating these pre-lightened pieces will more than pay off time-wise once you see the final result. Shampoo off, re-acidify the hair and then prepare to start the real process.
Although the target shade is a mix of both 6KG and 6KR I prefer to lay the truer red tone in as an overlay once I establish a believable tint-back. If the true red tones in 6KR were to dominate, the tinted-back hair may look synthetic or "wiggy" and be harder to match to the hair above. Therefore I alter my tint-back formula and use 6BK in conjunction with the 6KG. The 6KR will come into play later. The filler concept seems contradictory but works in the same way. If the light hair is extremely light and has no visible yellow then I fill with COPPER. If you have some yellow to work with then use RED. When in doubt, mix the two together within regular mixing guidelines.
Starting with the lightest areas first, apply the chosen mixture of Goldwell System Pre-Pigmentation using a Colorance bottle with the brush tip applicator. Section the hair evenly and work through the entire head effectively saturating all of the blonde hair making sure to include all of the new highlights. Distribute through with a fine-toothed comb and wipe off any excess pre-pig onto a towel. The hair should be damp but not dripping with the application. Blot off excess product otherwise there will be no room inside the hair for the actual color we have planned. This will have dried slightly and be more than ready to receive the Topchicformulation by the time you get back to these areas.
For a natural level 5-6, use a mixture of Goldwell Topchic 6KG 30ml + 6BK 10ml with 40ml of 20 volume Topchic lotion. Apply as if doing a retouch and complete the entire head. This formula will work on the re-growth as well as the other dark hair as long as it is indeed natural and not color-treated. Section the hair into the classic four quads and start at the nape. Using slices of hair on a color board, brush the first formula further down from the scalp application into the transitional areas. Diffuse one shade into the next with your brush into a second formula of Topchic 6KG 20ml + 6BK 15ml + 5K 5 ml with 40ml of 20 volume Topchic lotion. This formula should marry nicely with the previous one but has the additional 5K added as an anchor to make the tint-back portion more durable. Slide the panel off of the board and continue working with panels all the way up. Concentrate on diffusing the two formulae in the right areas. Complete all sections. Process for a full 30 minutes. Massage and manipulate the color together a few times during processing, paying close attention to the hair that is being tinted back the most. After the post-coloring basin procedure dry the hair and reassess the canvas to formulate an additional overlay.
After drying the hair a bit, flip the ends toward the scalp and compare the colors. Inspect the mid-range and look for trouble spots. Remember that it looks much more natural for the scalp hair to be richer and get slightly lighter toward the ends. NOT the other way around. A mixture of a similar formula made with Colorance mild alkaline can be a nice second application if the hair appears hollow or insufficiently blended. If you like the result proceed to the overlay. Custom formulate to the direction you would like to see MORE of. Working with B's and K's, what should be missing is the R.
Some overlays to consider would be:
- 6KR Colorance acid
- 6KR + RR-mix Colorance Mild Alkaline
Elumen makes for the best overlay if ALL banding is absolutely blended and undetectable. For the polish on this canvas and in order to achieve the target desired try a mixture of Elumen BK@6 + KB@7 + RR@all. Try equal parts and test mixture on white paper. Additional CLEAR or KK@all work well to tweak the formula to taste. Apply overall or get fancy and slice huge panels through the hair. Process and Finish.
The hair should now be gorgeous and look totally renewed. The right cut and style always punctuates a killer color job. And vice versa. Try all of the NEW Goldwell StyleSign styling products. They feature increased UVA/UVB protection as well as heat protection from styling up to 392 degrees F.! I would send Drew home with Goldwell ColorGlow IQ Deep Reflects Shampoo and Warm Red Conditioner and maybe even a can of 6KR or 7KG Soft Color! Be sure and give her some gloves!
If this technique inspires you (or makes you feel confused!) then please come and join us at one of our incredible North American Academies! We have a full-range of programs to suit exactly what you need to take your color work to that next level. Check us out! Are you DEDICATED to COLOR PERFECTION? Well we are. Come let us show you!